Controlling Access Points with CAPsMAN

CAPsMAN stands for Controlled Access Point System Manager. It is a feature in MikroTik RouterOS that allows you to centralize the management and configuration of multiple MikroTik wireless access points (APs) from a single point, known as the CAPsMAN controller.
With CAPsMAN, you can configure and manage wireless networks more efficiently, especially in scenarios where you have multiple access points spread across an area. The CAPsMAN controller can handle tasks such as channel assignment, transmit power control, security settings, and more for all connected access points. This centralized approach simplifies the deployment and maintenance of wireless networks.
Here's a brief overview of how CAPsMAN works:
- CAPsMAN Controller: This is the central point that manages and controls one or more CAPs (Controlled Access Points). The controller is typically a MikroTik router or access point.
- CAPs (Controlled Access Points): These are the wireless devices that are managed by the CAPsMAN controller. Each CAP connects to the controller, and the controller takes care of configuring and controlling the settings of each CAP.
- Centralized Configuration: Instead of configuring each individual access point separately, you can define configurations on the CAPsMAN controller, and it will push these settings to the connected CAPs.
- Simplified Management: CAPsMAN provides a centralized point for monitoring and managing the entire wireless network. Changes to configurations, such as adding a new SSID or updating security settings, can be done on the CAPsMAN controller and applied to all connected CAPs simultaneously.
This setup is particularly useful in scenarios like large office buildings, hotels, or public spaces where multiple access points are needed for adequate coverage. Instead of manually configuring each access point, administrators can use CAPsMAN to streamline the management process.
To complete this lab, we are going to use two Mikrotik routers with Wi-Fi capabilities (Your CAPsMAN Controller does not have to have wireless built-in, but it does need to have the wireless package installed). For our lab, we are using two hAP ac3 wireless routers, that we will designate TN0-3 (this will be our controller) and TN0-4 (this will be our CAP). Once your controller is setup, you can add any number of additional CAPs to your controller.
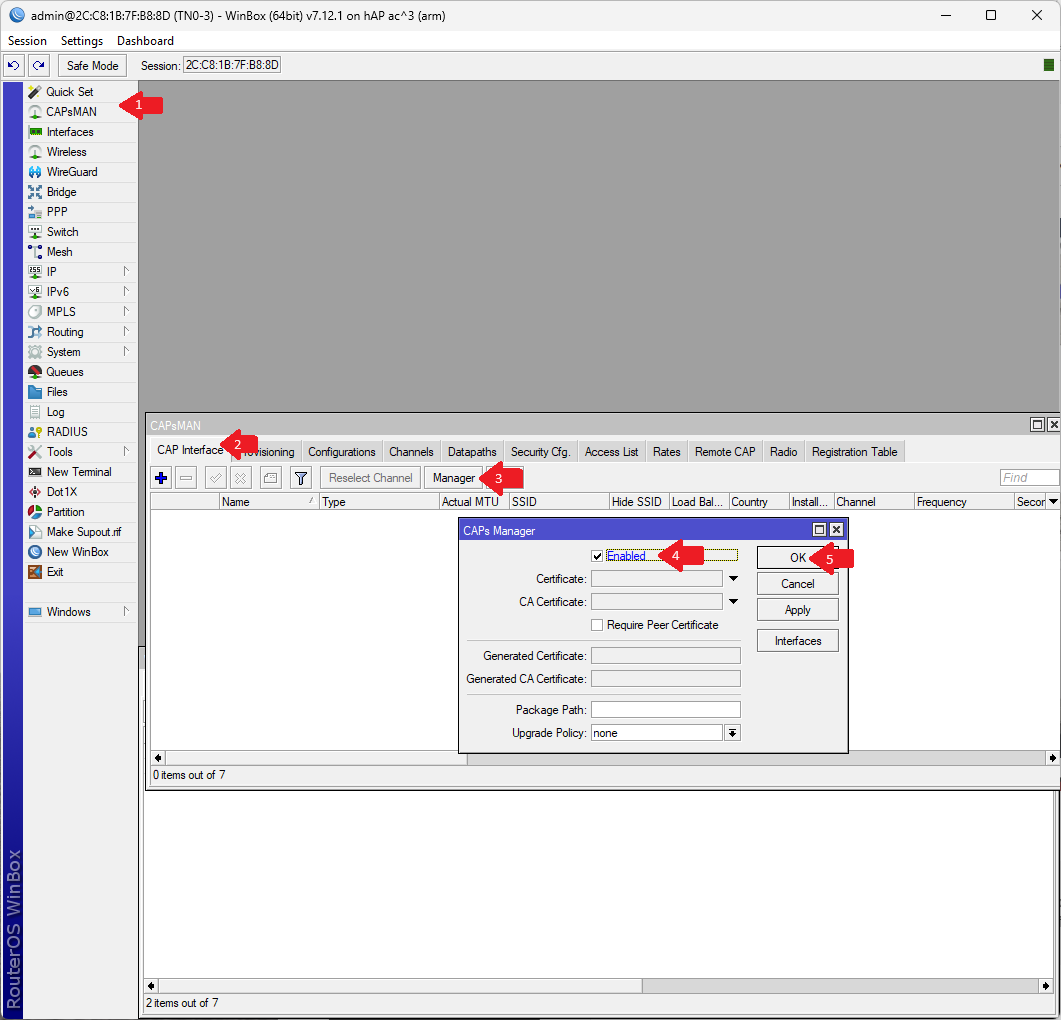
Step 1: Enable the CAPsMAN manager from the CAPsMAN -> CAP Interface -> Manager menu setting.
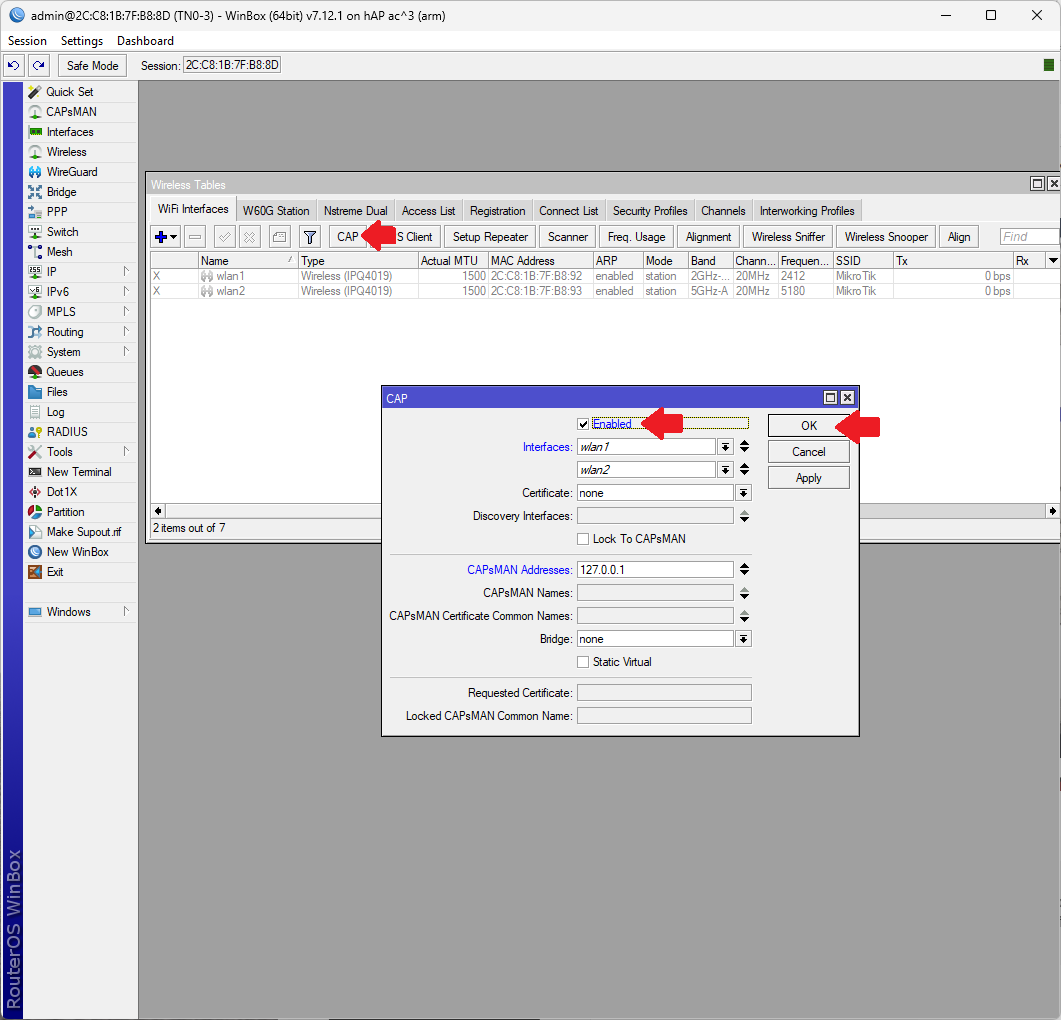
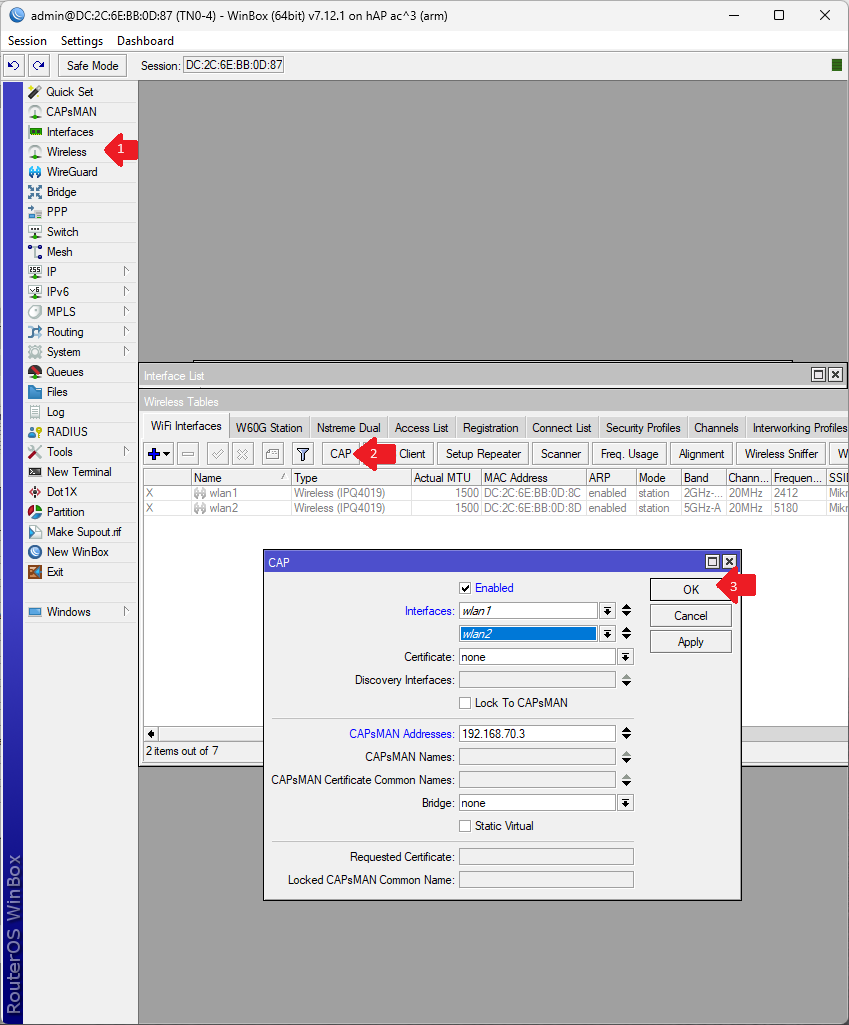
Step 2: (This step assumes that your device has wireless on-board. If your CAPsMAN controller does not have Wi-Fi on-board, you can skip this step). Enable CAP in the Wireless controller to allow the CAP Manager to control the on-board wireless capabilities. To do so, go into Wireless -> WiFi Interfaces -> CAP. Enable CAP, Add the interfaces that you wish CAPsMAN to manage (in our case, wlan1 and wlan2) and set the CAPsMAN Addresses to localhost (i.e. 127.0.0.1 - this setting specifies where to find the CAPsMAN server, and in this case this device) and then hit OK.
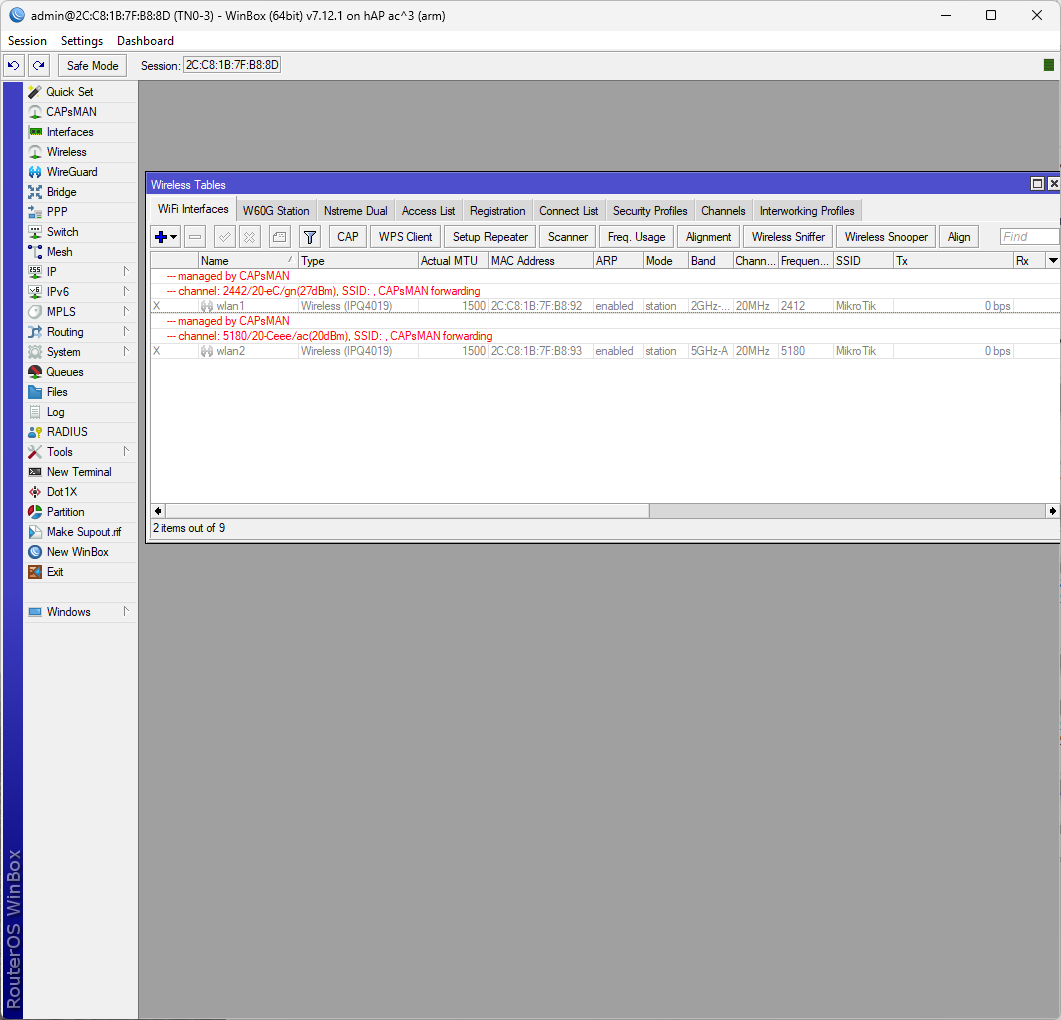
You will notice that once these changes are made, you are no longer able to manage your wireless settings from within the Wireless tab – they are now managed under the CAPsMAN settings menu.
CAPsMAN is now enabled on our router, but we need to configure it in order to get it to work properly. To do so, we set up one or more configurations which specify Wi-Fi settings, security, locality, etc.. which will be then assigned to any device controlled by the manager.
Step 3: Before we can create our CAPs Configuration file, we will need to create additional configurations for security, and data paths. This way, when we set up the configuration file, we simply just point to those configurations as part of the setup. (It is possible to create a configuration by including these settings directly in the configuration file itself but doing it this way allows us to re-use these settings should we decide to create additional configuration files in the future. It's a glass half-full vs glass half-empty argument. Do it whichever way you choose.)
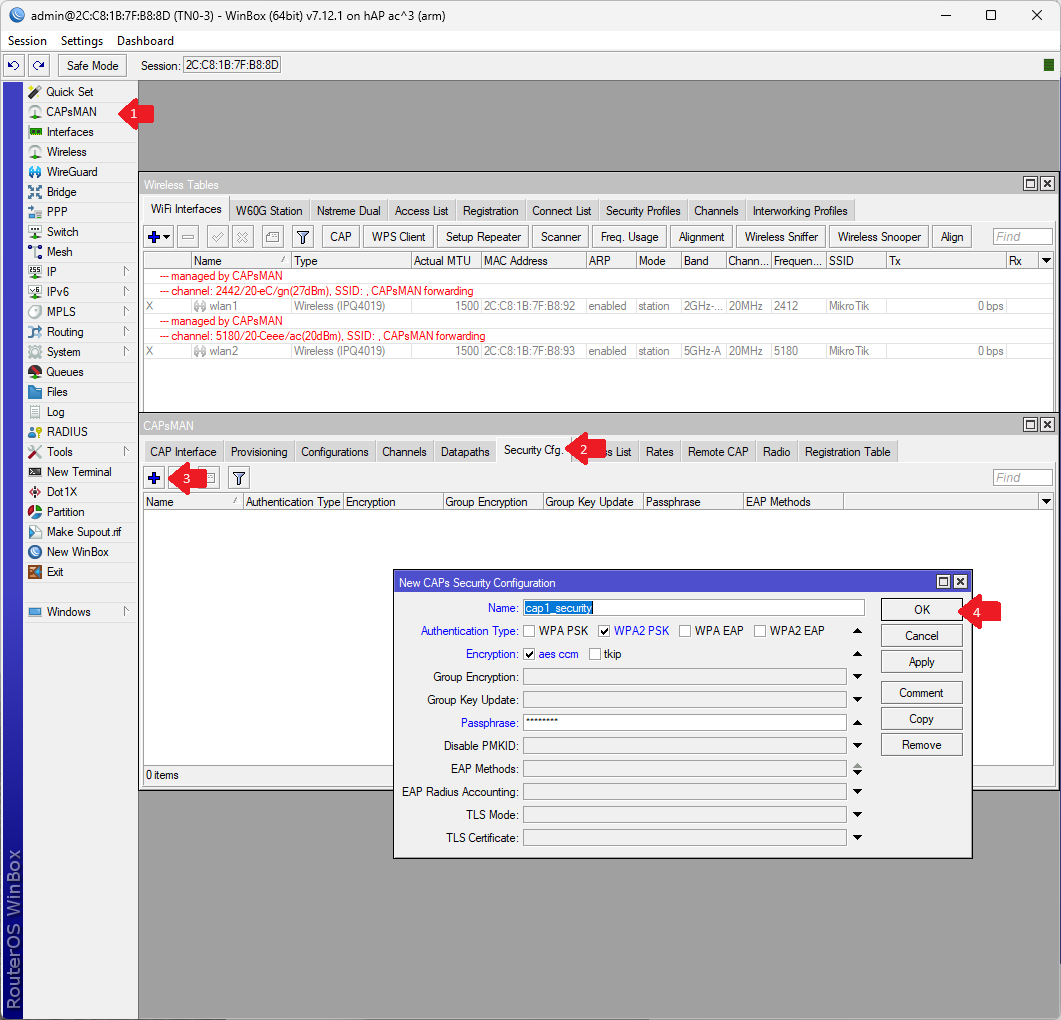
First, we are going to configure security. This is the equivalent of setting the password on your SSID. To do so, from the CAPsMAN Configuration window, select Security Cfg. and hit the + to create a new security configuration.
Step 4: Create a new security configuration as shown. Under the CAPsMAN menu click Security Cfg and hit the + button to create a new configuration. Set the Name, Authentication Type, Encryption, and the Passphrase, and hit OK when complete to save the security configuration.
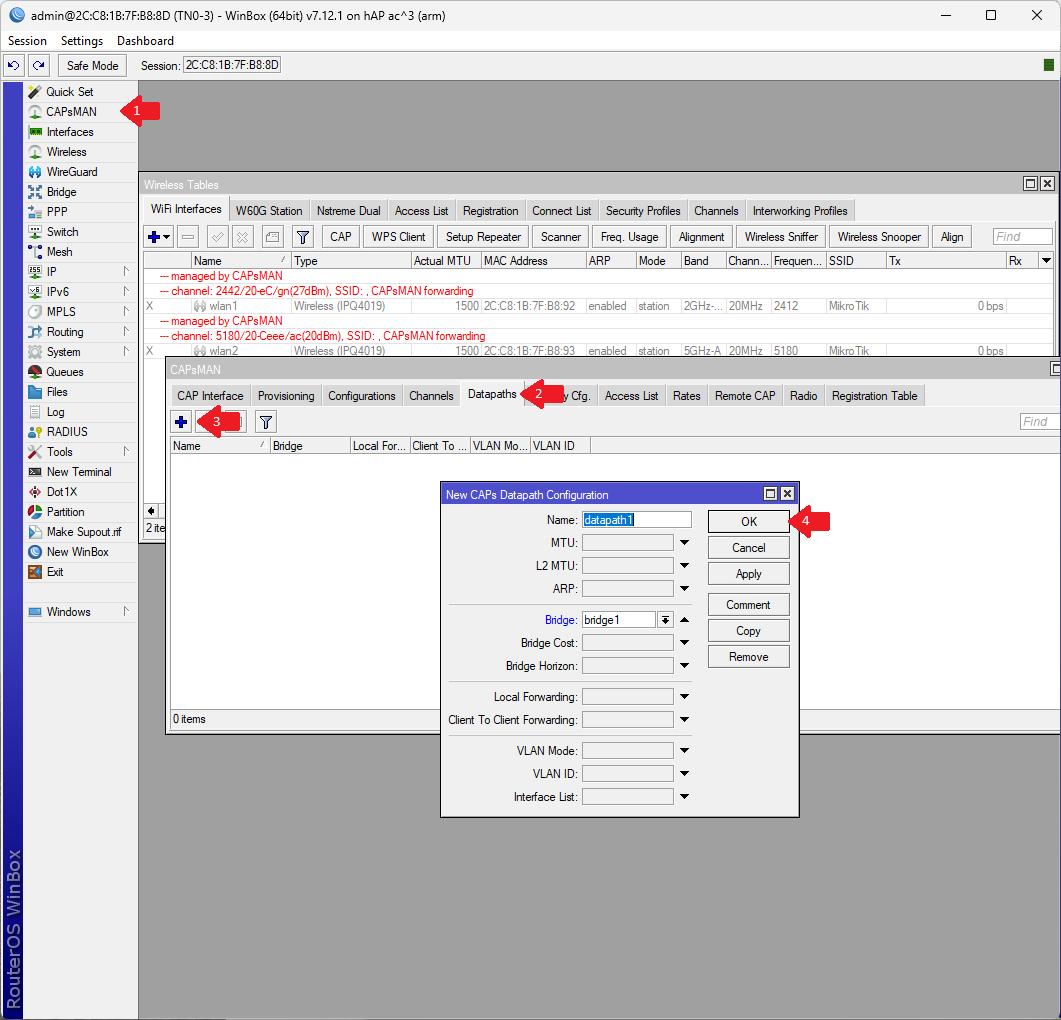
Step 5: Next we are going to setup a datapath. This specifies what bridge and/or vlan the CAP will attach to. Under the CAPsMAN menu click Datapaths and hit the + button to create a new configuration. Set the Name, and the bridge to attach to, and hit OK when complete to save the security configuration.
Step 7: We are going to create a new configuration file. To do so, go into CAPsMAN -> Configurations and hit the + button to create a new configuration. Please note that you will need a separate configuration for 2GHz vs 5GHz if you choose to specify the channel settings.
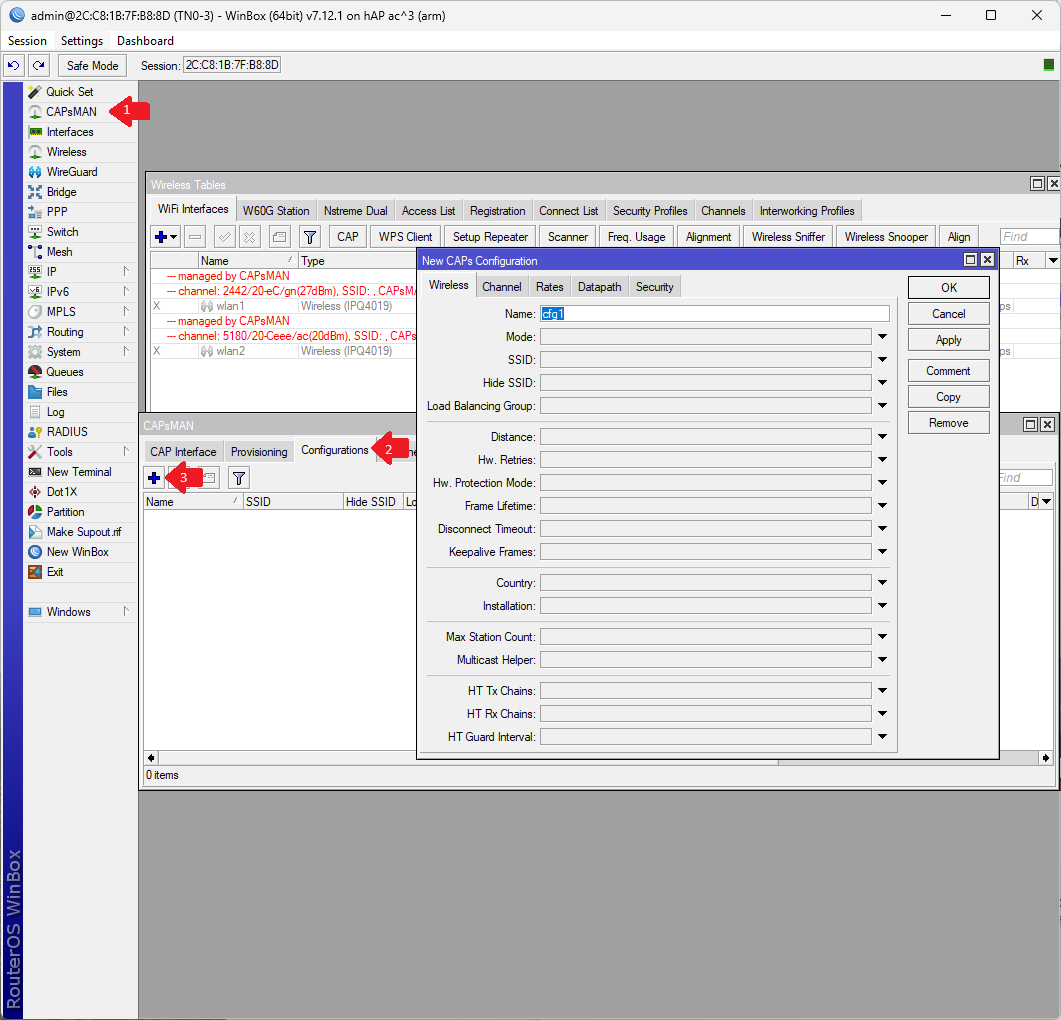
On the CAPs Configuration Wireless tab, enter the following:
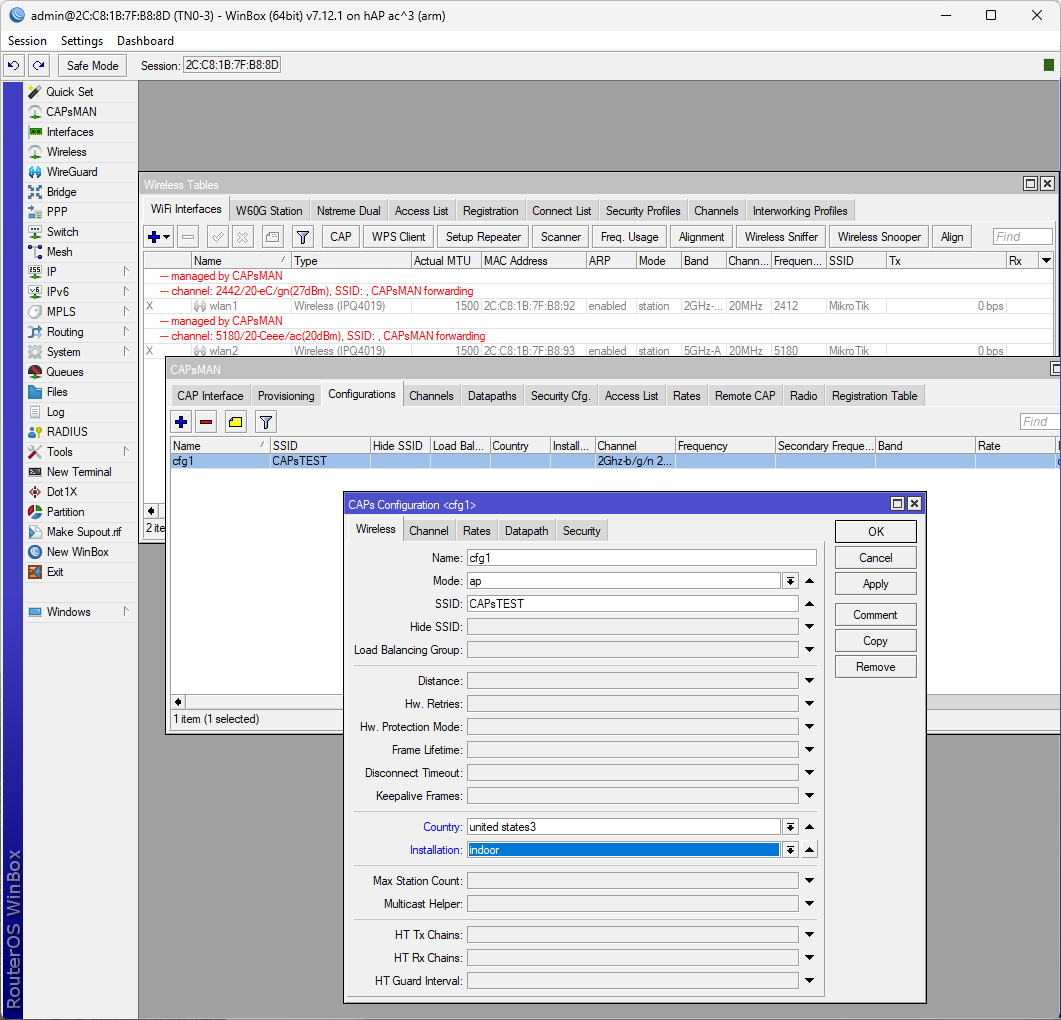
Mode: Set mode to ap as shown
SSID: Enter your Wireless SSID, in our case CAPsTEST and we specify our country and the installation type (indoor or outdoor)
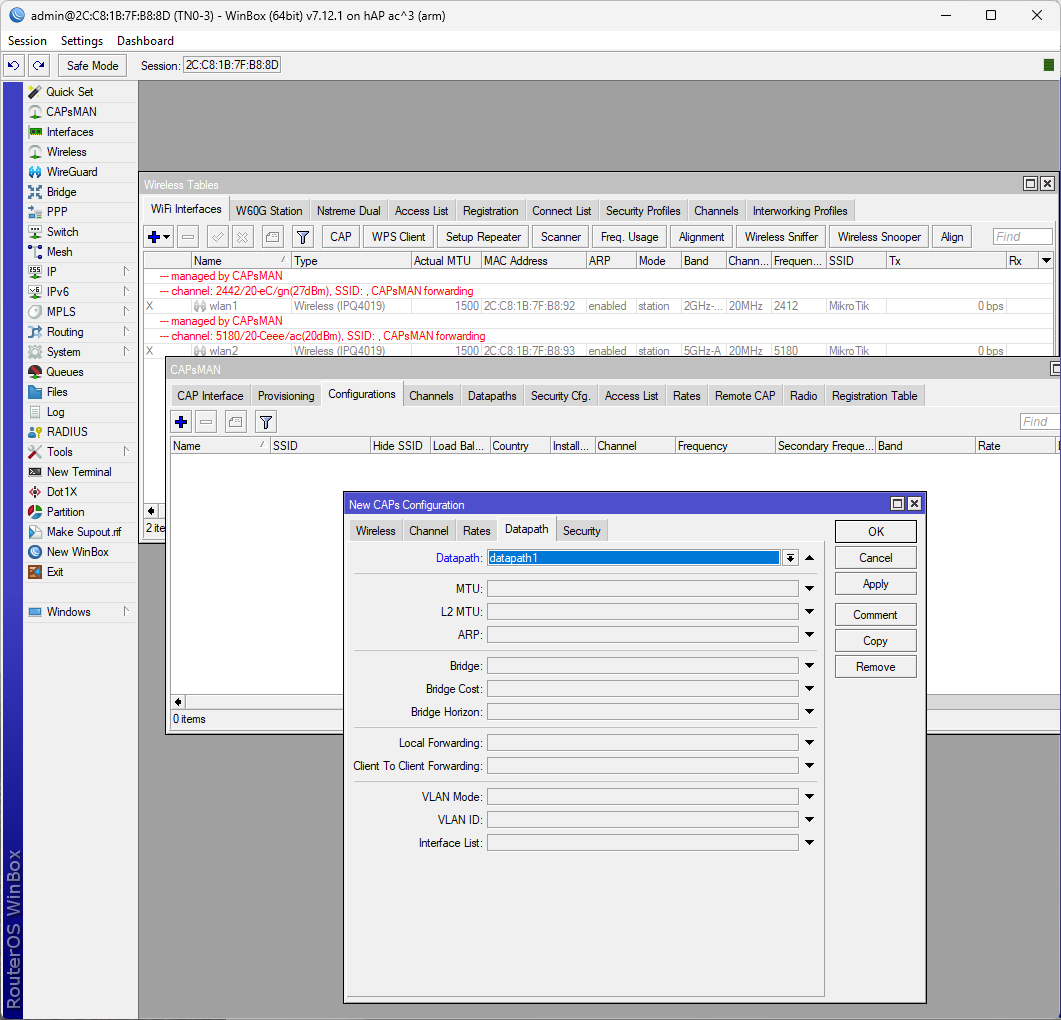
On the CAPsMAN Datapath page, under Datapath, select the datapath that we just created.
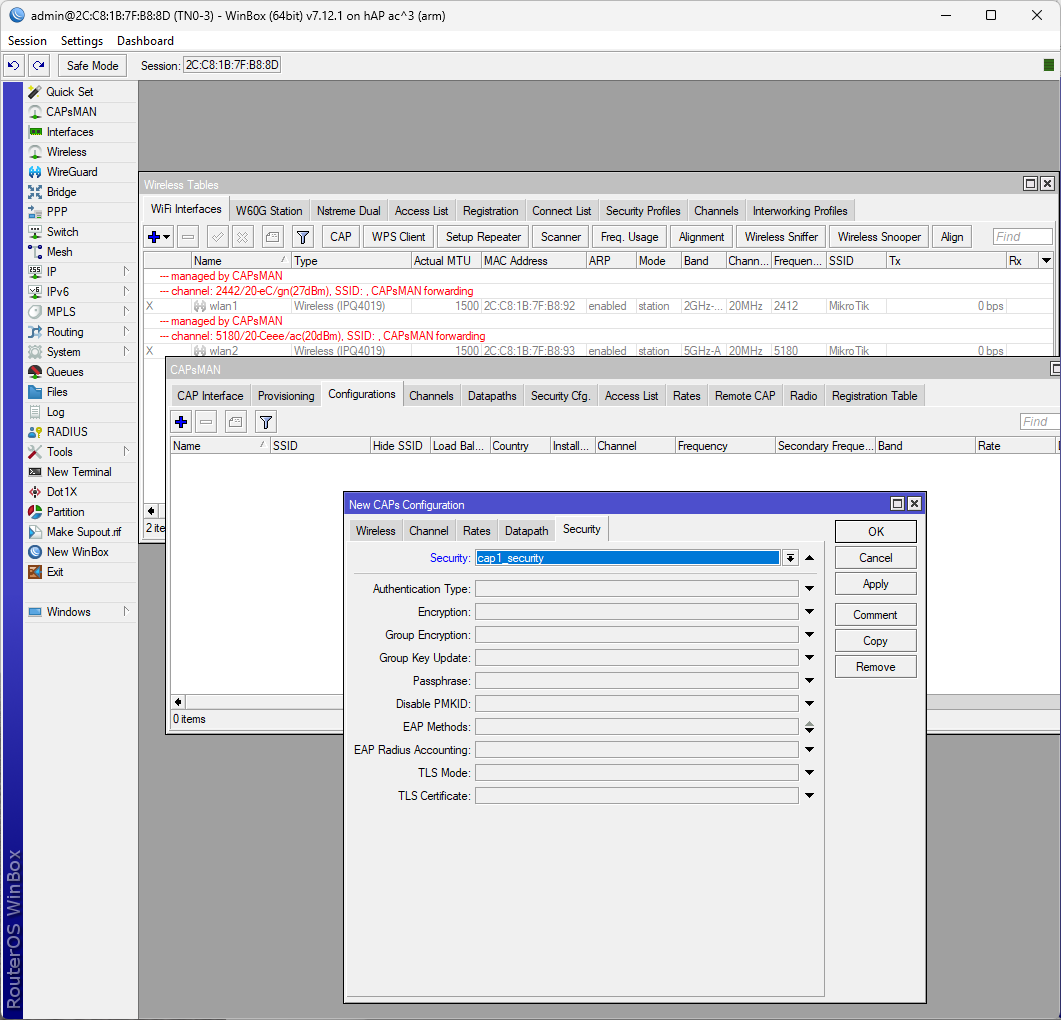
On the CAPsMAN Security page, specify the Security configuration that we created earlier.
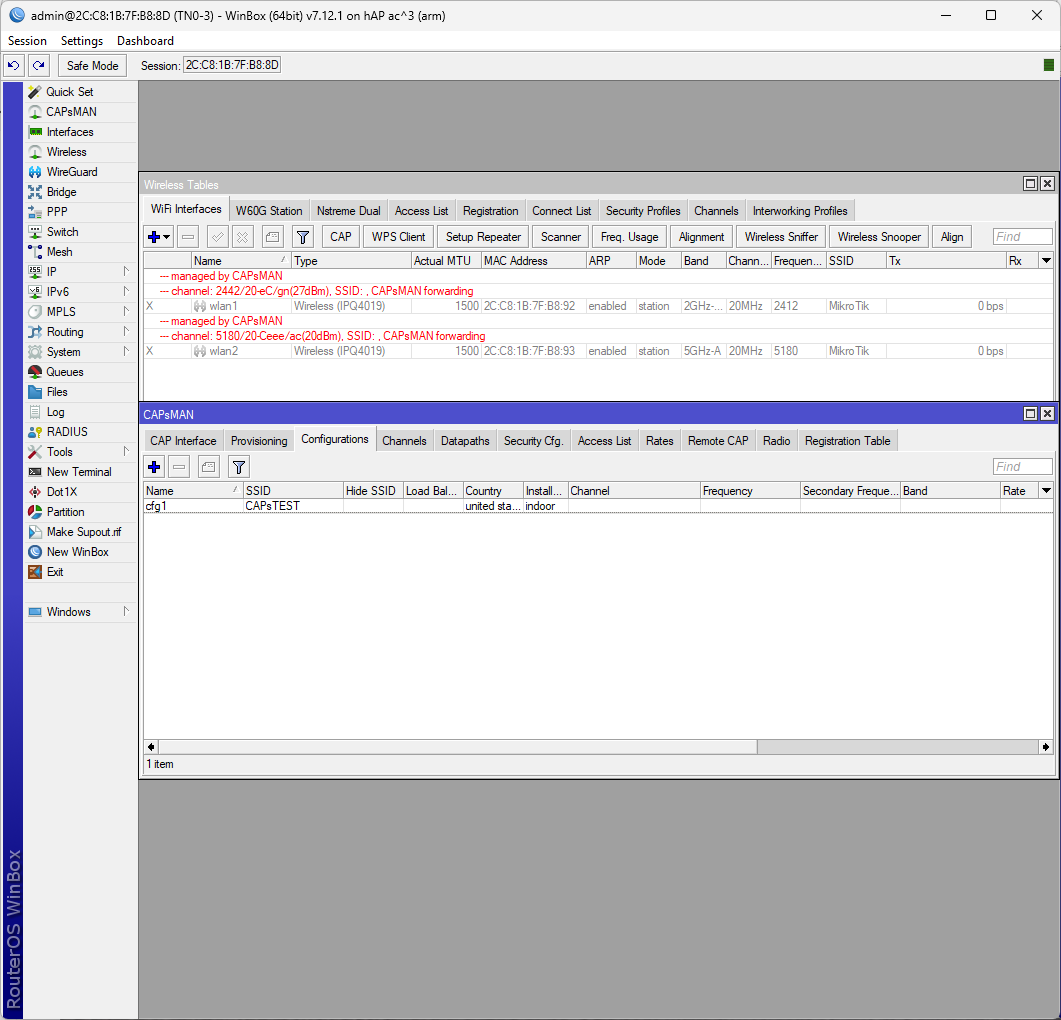
Once all these have been completed, click OK to create the configuration. We end up with our configuration as shown.
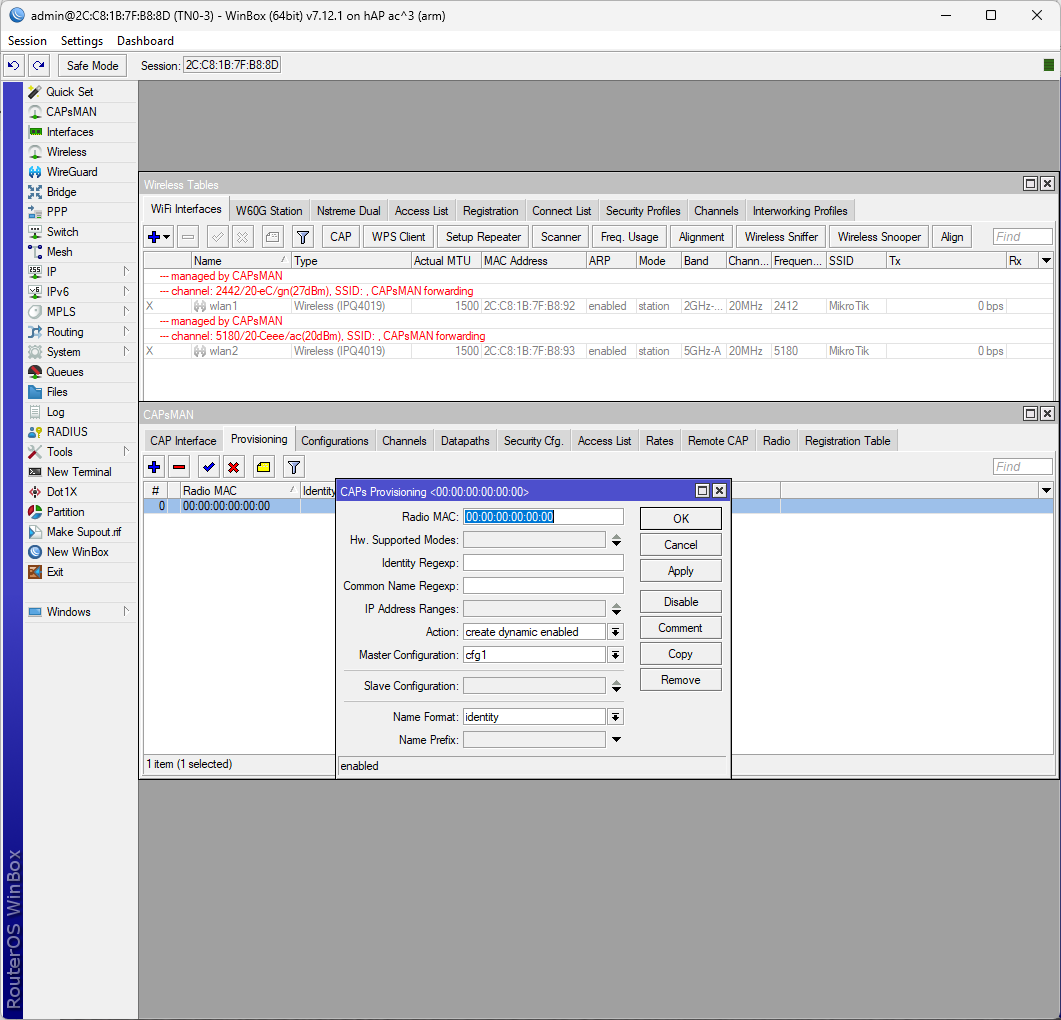
Step 8: Now we need to provision the configuration files. Provisioning allows us to determine which configuration files get assigned to which CAPs. To do so we are going to open the provisioning tab and hit the + to create a new provision file. For this example, we are going to simply assign the configuration files to any device that gets assigned to the CAPsMAN controller. In the provision file, set the Master Configuration to cfg1 and set the slave configuration to cfg2 and change Name Format to identity (which will allow the CAP to show up with the actual router name in the CAPsMAN manager) and hit the OK button when completed.
Our configuration on the CAPsMAN server is complete. Now, we will go to our AP and attach it to our CAPsMAN controller. To do so, log on to the AP, and go to the Wireless menu and hit the CAP button.
Now, if we look at our CAPsMAN manager, you will see that all our wireless interfaces are now listed.
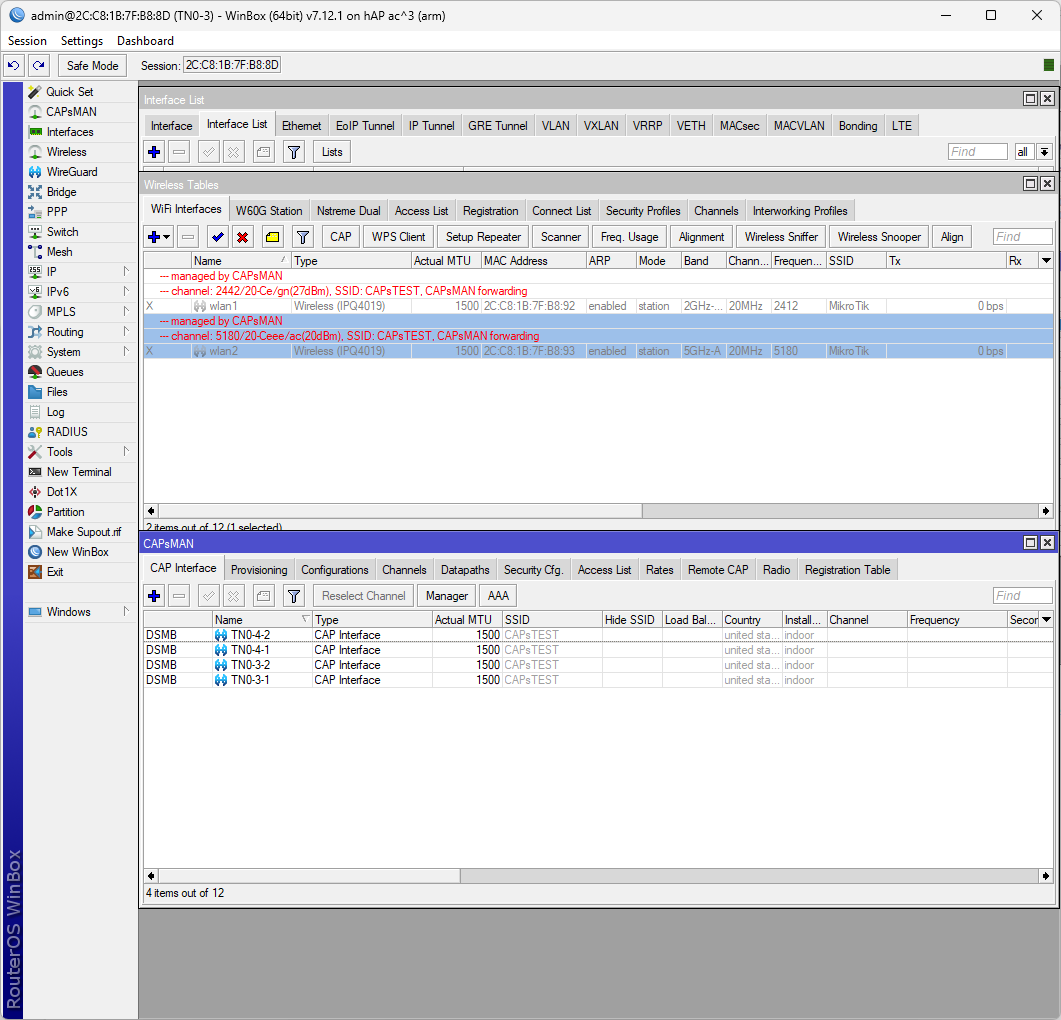
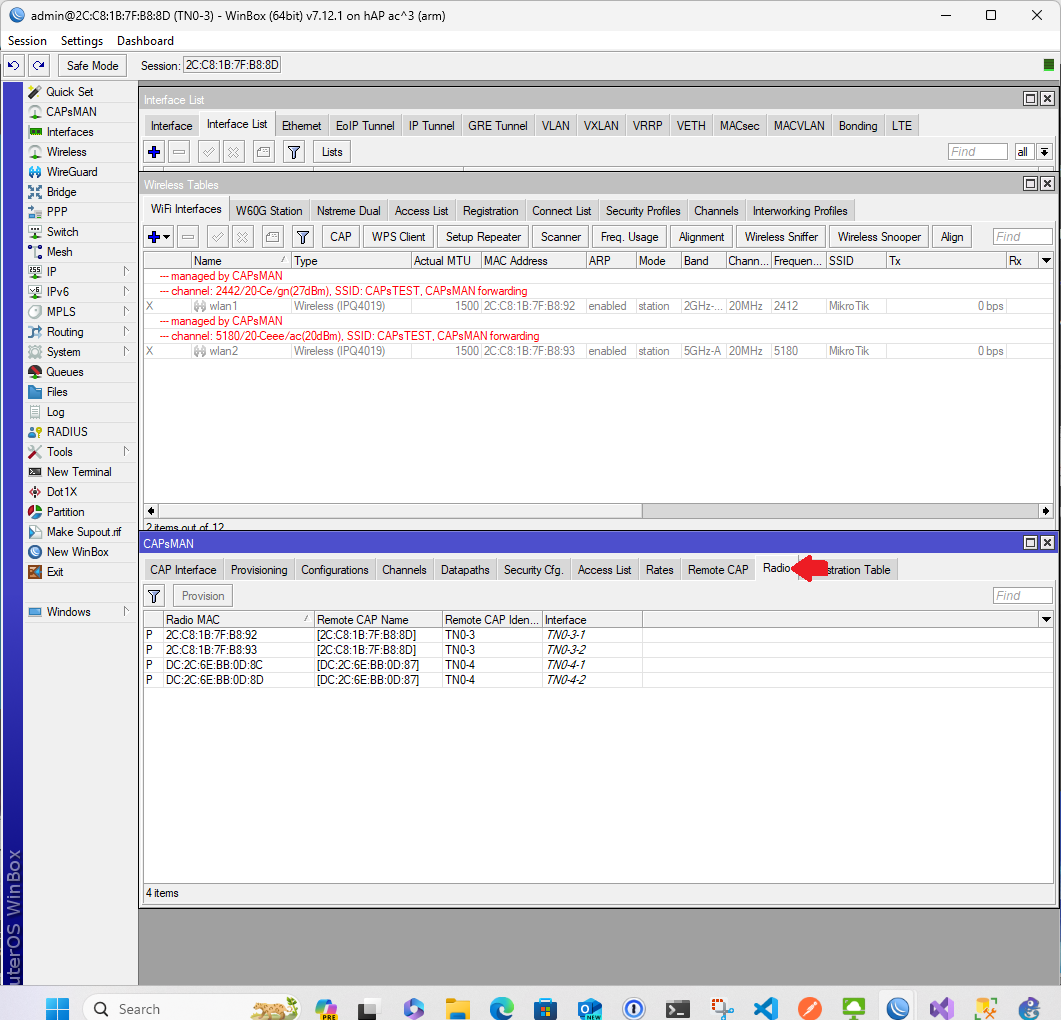
To look at which devices are provisioned by this CAPsMAN manager, hit the Radio tab. You should see all radios that are being managed by this device. If the device is listed, but does not have a P (Provision) next to it, select the Radio and hit the Provision button to reprovision this profile.
