Lab 5.1 Configuring PPTP Site-to-Site VPN
💡
Please be advised that this post is informational only. This is part 1 of our series in setting up VPN. We start with PPTP, which was a method initially of providing security by encrypting data between two endpoints. While some encryption is better than no encryption at all, Setting up PPTP (Point-to-Point Tunneling Protocol) for a VPN is generally considered a bad idea for several reasons:
Weak Security: PPTP is known for its weak encryption standards. It uses MS-CHAPv1 or MS-CHAPv2 for authentication and RC4 encryption, which are both outdated and vulnerable to modern attacks. This makes PPTP less secure compared to more modern VPN protocols.
Easily Exploited: PPTP has known vulnerabilities that make it susceptible to various types of attacks, such as brute-force attacks and dictionary attacks. For example, the MS-CHAPv2 authentication method has been cracked, allowing attackers to potentially decrypt traffic.
Limited Support for Modern Encryption: PPTP does not support modern encryption protocols like AES (Advanced Encryption Standard), which are more robust and secure. This limitation further compromises the confidentiality and integrity of your data.
Compatibility Issues: Although PPTP is supported by many older systems, it may not be compatible with newer operating systems and devices. This can lead to connectivity issues or the need for additional configuration.
Lack of Forward Secrecy: PPTP does not offer forward secrecy, a feature that ensures session keys are not compromised even if the server’s private key is exposed in the future. Without forward secrecy, if an attacker gains access to the server's key, they could potentially decrypt past communications.
Increased Risk of Data Leakage: Due to its poor security measures, using PPTP can increase the risk of data leakage and exposure of sensitive information. This is a significant concern for both personal and business communications.
For these reasons, it is generally recommended to use more secure and modern VPN protocols like SSTP, OpenVPN, L2TP/IPsec, or WireGuard, which offer stronger encryption and better overall security.
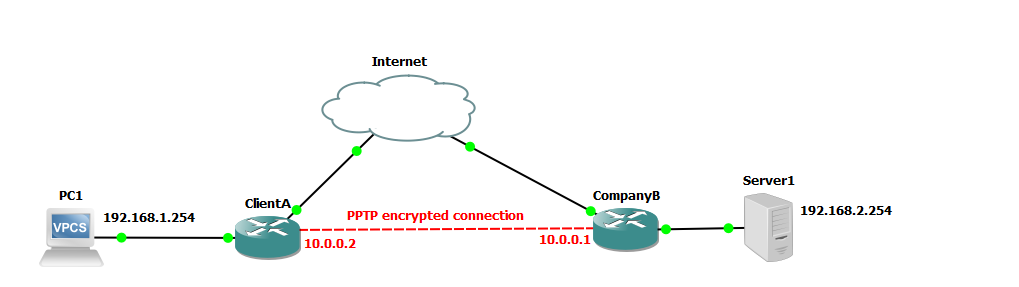
We are going to use the following network to demonstrate setup of a PPTP network.
